One of those important tips and ideas for making a pinata is to make sure – before you start to either spread many newspapers all around or create the pinata outside (creating a pinata can be messy).
And get ready for great family fun!
Basics for creating your own Pinata:
What you’ll need for the Pinata body is a big sturdy balloon (14 inch or bigger would be best), a 10-inch bowl, old newspapers, papier-mache paste (at the bottom of this page is an excellent papier-mache recipe), thin cardboard, tape, Crayons or markers, tissue paper or construction paper, string or yarn. If you’re feeling very ambitious, you can sculpt some really cool pinata shapes. Then, in order to sculpt a shape, follow the directions below for creating the pinata body and use a small balloon for the head with a cardboard neck and cardboard tubes for the legs or make an abstract shape with all kinds of balloons together.
Papier-Mache Paste Recipe:
This is the recipe for a smooth, light paste that is very easy to work with:
Combine 1/2 cup all-purpose flour and 2 cups cold water in a bowl. Add this mixture to a saucepan of 2 cups boiling water and bring it to a boil again.
Remove from the heat and stir in 3 tablespoons of sugar. Then, let it cool (it will thicken as it cools). Once it cools, the paste is ready for use.
(Try to make only the amount of papier-mache paste you need. Even in the refrigerator, paste spoils quickly.)
Step One
Blow up a balloon and tie a knot at the end. Then, place the balloon on the 10-inch bowl for stability while working.
Take newspapers and tear (don’t cut) into strips about 1 inch wide and about 6 inches long (you tear so the strips have fairly rough edges and that helps to make a smooth overall surface).
Pour papier-mache paste into a disposable bowl and dip the newspaper strips into the papier-mache paste. Then, spread them at an angle (and overlapping) onto the balloon thoroughly covering it.
Continue doing this until the balloon is completely covered with one layer of paper. It’ll take up to 24 hours to dry.
Cover your leftover papier-mache with saran wrap so that it won’t dry out. If it does, then add some warm water.
Step Two
After your first layer has dried, take a long piece of strong yarn or string, double it so that it is even stronger, and wrap the midpoint of the sting around the bottom of the balloon, pulling the ends up to the top. Then tape it to the balloon in a few places and knot together the ends of the string 6 inches above the top.
Step Three
Now, with strips of comics, cover the balloon (including the string) placing the strips at a different angle from the first layer (using different colored strips lets you distinguish one layer from the next, ensuring a uniform overall thickness – that’s why we’ve changed to comics :-).
Again, allow the second layer to dry.
Step Four
After the second layer is dry… Guess what? Yup! A third layer – remember that the kids are going to be hitting on it so it must be strong.
Cover the balloon with newspaper strips (we’re back to newspaper…), covering in yet another angle. You should smooth over any rough edges that might come about.
Step Five
This is where you cut a 2-inch square hole on the top. But don’t cut all four sides of the hole – only three sides so that it will be like a flap and you’ll be able to close it later. Also, you’ll want to tie a string strong enough so that it doesn’t tear. To do this- thread the string/twine through the dried paper mache balloon. Poke holes, thread string, tape over the string, then paper mache over the tape because crepe paper will not stick to tape (masking tape).
Step Six
This is where you start decorating! You can decorate however you like. Choose colors that suite your theme, add different colored tissue squares and glue them all around, add streamers, etc. Have fun with this step!
Step Seven
Make sure the inside of the pinata is completely dry before you fill it (so that the candy won’t stick to the sides). Fill it about halfway with all kinds of candy, trinkets, little gifts etc. After filling the pinata, tape the flap that you made and cover with more decorations.
Step Eight
And here’s the best and favorite step of all! Let’s play!! You can hang the pinata up from the ceiling, or on a tree branch in the yard. Each kid (blindfolded of course) takes a turn trying to break the pinata with a stick (a broom handle works well). Turn the kid around in a circle 2 or 3 times and point him or her in the direction of the pinata. The kid gets to swing the stick two or three times. Make sure everyone else stands clear of the swinging stick, including the grown-ups!!! Then another kid gets a turn.
When someone breaks the pinata, all the children get to gather the goodies. Often young kids can feel that this method is unfair because all of the children don’t get the same amount of candy. To avoid hurt feelings, you can put aside a small bag of candy for each child with their name on it. This, will not only keep the party people happy, but will give kids a place to empty their pockets and take home their loot!
Visitor-Submitted Pinata Ideas:
Giraffe Pinata
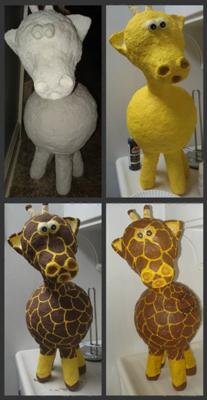
I made this homemade girafe pinata for a safari themed birthday party… I used two balloons – one for the head and one for the body. After I covered the balloons with paper mache, I waited until they dried and then I connected them with a paper-towel roll. I poked four holes in the body and inserted shorter paper-towel rolls for the legs. I reinforced everything with more paper mache. After everything was dry I painted and stained it. It was the “hit” of the party… haha
Skateboard Pinata
Submitted by Dorian from Casa Grande, AZ
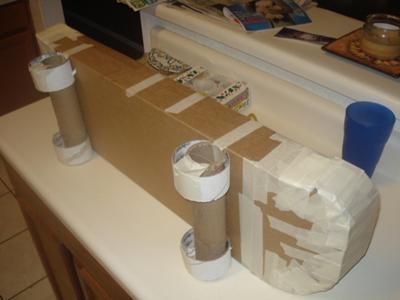
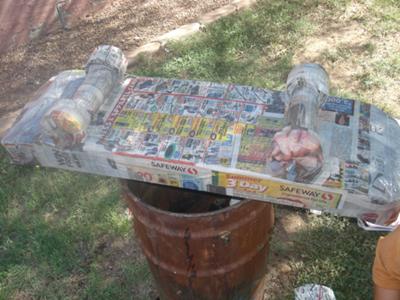
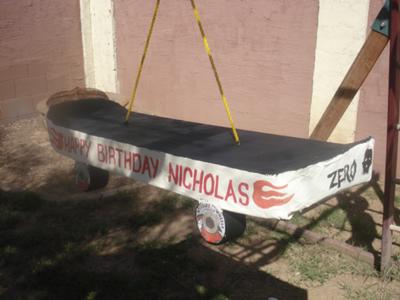
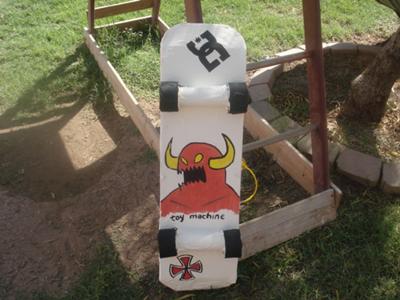
For this homemade skateboard pinata use cardboard to make frame. Wrap it with masking tape, mixed Elmers glue and water together to help newspaper stick to cardboard. Then paint with acrylic paints. It took 12 kids to break it, but they all enjoyed it.
Curious George Pinata
Submitted by Patty from Felton, Delaware
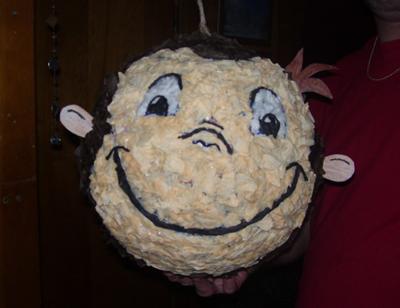
I used one punchy balloon, strips of newspaper, and crepe paper torn into approx. 1″ pieces. I mixed flour and water and added about a half a bottle of Elmer’s glue to the mix. First I blew up the balloon. Then I used 4 lengths of twine tied together in the middle around the bottom of the balloon and coming up around to the top where I tied them all together. Then I started to put the strips of newspaper dipped into the “glue” covering the entire balloon.
I let that dry for 1 day until completely dry, then I do the same thing again and let it dry another day until completely dry. If you want a really strong pinata for older children, you will need to do one or more layers. When it is completely dry I pop the balloon inside and take it out. I then cut a square only on 3 sides near the top, this is where you will put the candy in. I then came up with a design and marked it out on the pinata and began to fill it in with the colored crepe paper. I’ve made a special pinata every year for my sons birthdays and now I make them for my grandchildren. This year I made a Curious George one for my grandsons 1st birthday.
Birthday Present Pinata
Cover a box with papier-mache & follow instructions above. For the design, 1st draw on the box using a ruler to make it look like a wide ribbon has been wrapped around a present then decorate it using small squares of tissue paper, get a pencil center it on the square of tissue paper & twist the tissue paper up the pencil with your fingers now dip the bottom in glue & place it on the box in the appropriate area use 2 colors one for the present & one for the ribbon. Make a bow out of streamers & glue it on top after you have filled the box with candy. Have fun!
Kid Birthday Parties › Kid Activities › Making a Pinata
Deal or No Deal Game Show Pinata
We are using a large cereal box to make the pinata look like a case from the Deal Or No Deal Game Show. The number on the case is the age of the child.
Dollar Tree Balloon Pinata Idea
The Dollar Tree store has many different helium balloons to include – flowers, hearts, butterflies, etc. Get one in the shape you want (I’ve used a Heart for Valentine’s Day and this year for a Luau party I’m going to be doing a Flower).
Then, wrap it in a layer of paper and tape before paper mache. After that – Paper mache as normal. Carefully pop the balloon so not to ruin the design. Cut around edges of balloon and wipe clean. Paint pinata or do tissue paper and glue cut out balloon to outside of pinata.
Birthday Theme Pinatas
I “stole” this idea from the local Mexican store.
First, I made the pinata with the known basic steps. I then pasted on different colors of colored streamers.
Then, I took the theme plate (Dora the Explorer, in my case) and taped it onto the center of both sides of the balloon.
I used masking tape to tape on party hats (other types of tape may work better). I took some of the matching colored streamers and placed them on each end of each hat.
I used 4 hats all around the pinata to represent the shape of a star.
This is my first real pinata with a theme, therefore, it’s pretty basic.
Spongebob Homemade Pinata
I made a Sponge Bob pinata from 12-pack soda boxes, flour and water to paste, newspaper to cover, colored tissue papers. It turned out great and we had a blast!
PVA Glue Works for Making a Pinata
If you don’t have the ingredients to make the papier mache paste, then you can use PVA glue, it can work great :)
Kids Decorating Pinata Activity
Another great idea is to make your pinata plain white, three days before the party. Then at the party, have all the kid’s decorate it with markers, stickers, etc. this way each kid can say heshe MADE the pinata.